- Hexagon drill socket 5/16 or 8mm
- 7/32 or 5.5mm drill bit
- Electric drill (Preferably variable speed & reversible)
- Self drilling screws
- Mallet (or timber block and hammer)
- Choose your own Cladding
- Hacksaw (if cutting required)
- Tape Measure
The widest single gate you can make using the Fortress Gates system is 2.1 meters using one of the HDD1.9 products that include a brace.
The widest double gate would therefore be 4.2 meters using two of the HDD1.9 products.
The maximum height supported is 2000mm.
Remember, you can still build a taller gate by extending the timber or cladding beyond the height of the frame.
We recommend the following as a minimum.
Wooden Posts – 125mm x 125mm cypress pine
Steel Posts – 75mm x 75mm x 3mm
For further information call Fortress Gates on (03) 9789 7635.
To attach hinges to a wooden post, use 50 x 8mm coach screws.
Predrill your hole (say 6mm) on the post and lubricate the coach screw so as not snap the head of the screw when you are fixing the hinge to the post.
To attach hinges to a steel post up to 6mm wall thickness use a No. 14 x 22 mm self drilling screw.
No. 10-16 x 16mm self-drilling screws to attach your drop bolt, gothic latch or other accessories.
No. 12-14 x 35mm self-drilling screws to attach pickets or decking between 20-22 mm thick.
No. 12-14 x 45mm self-drilling screws to attach 1″(25mm) boards. eg 6″x1″ pine.
If you have any other questions regarding screws please contact the office on 03 9789 7635.
Hinges are designed to be REVERSIBLE – e.g. can swing from the Left Hand or Right Hand post. if your hinge is upside down (cap at bottom and opening at top) you will need to REVERSE it as follows:
A hardened steel ball bearing is held captive within the hinge barrel. It can move from end to end but cannot come out. To reverse the hinge:
Remove plastic oil cap to expose ball bearing
Place end of hinge pin against ball bearing
Use mallet or heavy block of wood to hit the hinge pin and dislodge ball bearing from its retaining groove. Do not use metal hammer as it may burr the end of the hinge pin.
Note: this may take a good solid hit
Tap ball bearing down until it snaps into retaining groove at the other end.
Insert plastic oil cap to cover ball bearing
Tips:
Remove plastic oil cap and squirt a small amount of oil into hinge barrel every 12 months.
Do not install gates with one of the hinges upside down (sometimes done to prevent gates from being lifted off hinge pins). This allows water to fill hinge barrel which will eventually rust and seize.
Hinges are designed to be fixed to the FRONT or BACK of gate posts therefore allowing the gate to open 180 degrees. It is not recommended to fix hinges on the inside of post as is typical of a door hinge – this could restrict the gate opening to only 90 degrees.

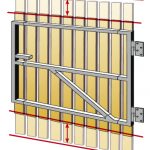
Some cladding such as Colourbond Sheeting will act as a brace once it is secured to the frame. It is also very light and therefore does not require bracing.
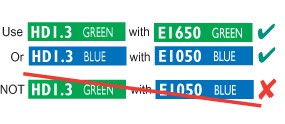
If you need a brace purchase one of the HD or HDD products. HD products
are colour coded e.g. HD1.3 for E1650 has a GREEN label – must be used with E1650 or the E840 which also have GREEN labels.
This is because the brace is welded at a set angle and won’t fit with some of the vertical sections.
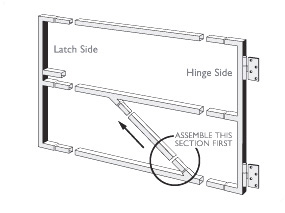
Assemble the brace section first. The diagonal should point upwards towards the latch side (not down).
Which direction does the brace go?
The brace starts at the Latch side and runs downwards to the bottom hinge. This is so that the brace joints are under compression and cannot come apart.

Assemble the ‘Z’ shaped brace section first otherwise your frame will not go together.
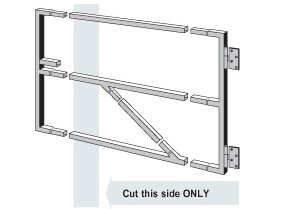
Approximately 300 mm can be cut off the width of a HD product.
CAUTION – don’t cut the wrong end or your frame will be ruined. Only cut back on the latch side – see illustration.
As a set of three – e.g. H700; these do not include a brace and are generally used for single gates. Screws are included.
As a braced set – e.g. HD1.3 for E1650; these include a brace and are generally used for wider heavier gates. Screws are included.
Individually – e.g. FPR2.0; these are generally used for constructing fence panels. Screws are not included.
Made from 25X25X1.6 mm Australian Steel Tubing that is Galvanised inside and outside to protect against rust. Corners are mitred and fully welded to provide maximum strength. Welded areas are primed. Self drilling screws are used to assemble your frame and are supplied with Horizontal rail packs.
All frames have Australian made heavy duty Reversible Ball Bearing hinges welded on, they can swing Left Hand or Right Hand. The type of screws used to hang your gate will depend on the type of posts your gate will hang on. Screws are therefore not provided for hinges.